The Contact Us page is one of an essential page to have on your website. It plays an integral part of a website allowing users, the customers, investors, or perhaps advertisers to get in contact with you. As a business owner, having a contact Us page converts users into potential customers for your business. Contact us page is mainly for website visitors to reach your business easily. Nowadays, most websites owners only place their email address on their contact us page. This is not good enough, the contact page has to be effective and have contact forms for easy communications.

Did you have a Blogger Blog and will like to include a custom contact form on your contact us page? I will be discussing about that today. Even if you have a business email this contact form will work perfectly for you. One importance of ths form is that the message will be delived to you once the message ws sent on your website there won't be any delay at all. Now let's get started:
How to create Contact Form Widget on Blogger
For us to add a contact us page on blogger, the easiest and fastest way is to add contact form widget first. After that we will move the widget to a custom page.
1. Go to Blogger Dashboard ==> Layout
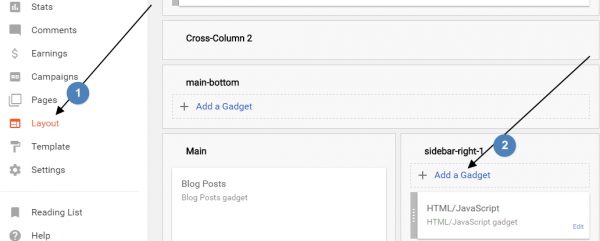
2. Click on any of the “Add a Gadget“. A popup will showup just go to more gadgets section and choose Contact Form.
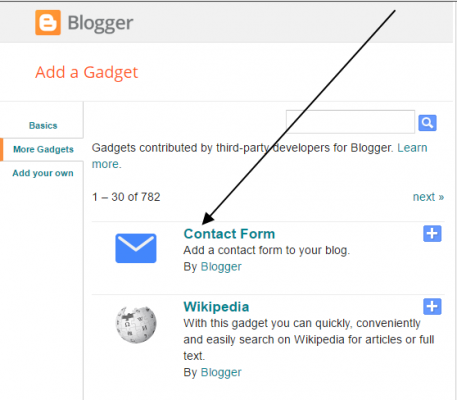
3. Just add it without changing the title.
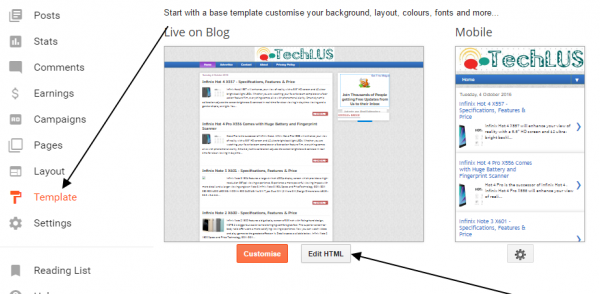
4. Now go to Template >> Edit HTML on your Dashboard.
5. Search for /b:skin and place the below code just before ]] which is infront of /b:skin.
div#ContactForm1 {

display: none !important;

}
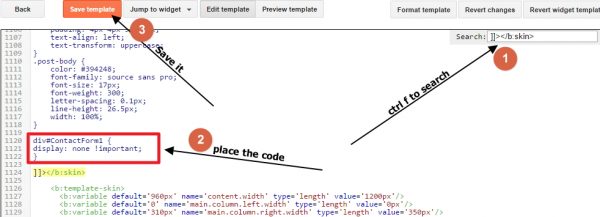
The code is just to hide the contact form since we will be making use of it on a page.
How To Add the Contact Form to Your Blog Contact Page
1. Go to Pages section on your blogger dashboard.
2. Create a New Page by clicking on new page at the top.
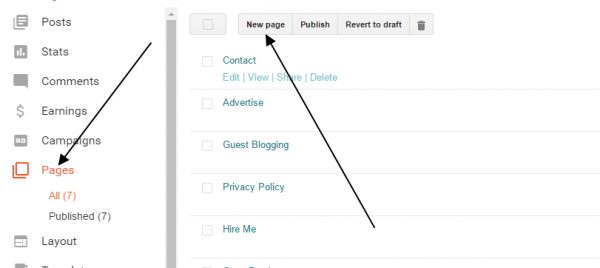
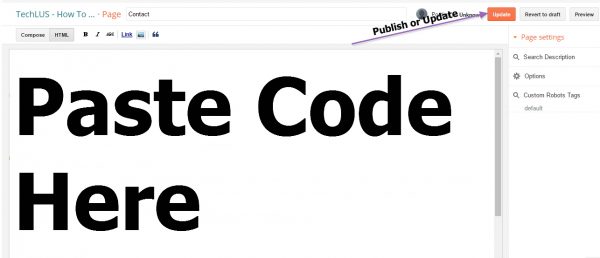
3. Put Contact Us in the Page Title field and copy the below code to the main content text area.
[HTML]
<style type=”text/css”>
input {<br />
border: 1px solid green;<br />
-webkit-box-shadow:<br />
inset 0 0 8px rgba(0,0,0,0.1),<br />
0 0 16px rgba(0,0,0,0.1);<br />
-moz-box-shadow:<br />
inset 0 0 8px rgba(0,0,0,0.1),<br />
0 0 16px rgba(0,0,0,0.1);<br />
box-shadow:<br />
inset 0 0 8px rgba(0,0,0,0.1),<br />
0 0 16px rgba(0,0,0,0.1);<br />
padding: 15px;<br />
background: rgba(255,255,255,0.5);<br />
margin: 0 0 10px 0;<br />
}<br />
</style> <style type=”text/css”>
.techblogngbtn {<br />
background: #3498db;<br />
background-image: -webkit-linear-gradient(top, #3498db, #2980b9);<br />
background-image: -moz-linear-gradient(top, #3498db, #2980b9);<br />
background-image: -ms-linear-gradient(top, #3498db, #2980b9);<br />
background-image: -o-linear-gradient(top, #3498db, #2980b9);<br />
background-image: linear-gradient(to bottom, #3498db, #2980b9);<br />
-webkit-border-radius: 28;<br />
-moz-border-radius: 28;<br />
border-radius: 28px;<br />
text-shadow: 1px 1px 3px #ffff3d;<br />
font-family: Arial;<br />
color: #ffffff;<br />
font-size: 16px;<br />
padding: 10px 20px 10px 20px;<br />
text-decoration: none;<br />
}</p>
<p>.techblogngbtn:hover {<br />
background: #3cb0fd;<br />
background-image: -webkit-linear-gradient(top, #3cb0fd, #3498db);<br />
background-image: -moz-linear-gradient(top, #3cb0fd, #3498db);<br />
background-image: -ms-linear-gradient(top, #3cb0fd, #3498db);<br />
background-image: -o-linear-gradient(top, #3cb0fd, #3498db);<br />
background-image: linear-gradient(to bottom, #3cb0fd, #3498db);<br />
text-decoration: none;<br />
}<br />
</style>
<!– custom https://hiideemedia.com contact us page starts –>
<div id=”custom_ContactForm1″ class=”widget ContactForm”>
<div class=”techblogng-contact-form-widget” align=”left”>
Your can contact us by filling the form below appropriately. We will get back to you in less than 24 hours after receiving your message.
<div class=”form”><form style=”border: 0px solid #ccc; padding: 3px; text-align: center;” name=”contact-form”><b>Your Name</b>
<input id=”ContactForm1_contact-form-name” class=”input” style=”width: 450px;” name=”name” type=”text” value=”” />
<b>Your Email Address</b><span style=”font-weight: bolder;”>*</span>
<input id=”ContactForm1_contact-form-email” class=”input” style=”width: 450px;” name=”email” type=”text” value=”” />
<b>Your Message</b><span style=”font-weight: bolder;”>*</span>
<textarea id=”ContactForm1_contact-form-email-message” class=”input” style=”width: 450px;” cols=”25″ name=”email-message” rows=”5″></textarea>
<input id=”ContactForm1_contact-form-submit” class=”techblogngbtn” type=”button” value=”Send” />
<div style=”text-align: center; max-width: 450px; width: 100%;”>
<p id=”ContactForm1_contact-form-success-message” class=”contact-form-success-message”></p>
</div>
</form></div>
</div>
<div class=”clear”></div>
<span class=”widget-item-control”>
<span class=”item-control blog-admin”>
<a class=”quickedit” title=”Edit” href=”//www.blogger.com/rearrange?blogID=8799058979810298021&widgetType=ContactForm&widgetId=ContactForm1&action=editWidget§ionId=sidebar-right-1″ target=”configContactForm1″ rel=”noopener”>
<img src=”//img1.blogblog.com/img/icon18_wrench_allbkg.png” alt=”” width=”18″ height=”18″ />
</a>
</span>
</span>
<div class=”clear”></div>
</div>
<!– custom https://hiideemedia.com contact us page ends –>
[/HTML]
Now Visit your contact page and test your contact form.
How to Send Blogger Contact Form Messages to Business Email/Custom Email
The contact form will send messages to your blogger Gmail account by default. Did you have a business or custom email (e.g. [email protected]) you will like to direct the contact form messages to???
If you will like to receive your contact form messages to your business email or custom email follow the steps below:
1. Login to your Blogger Gmail Account
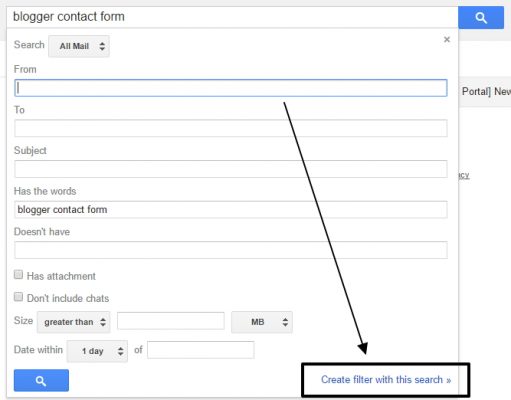
2. Locate the search field at the top and search for “Blogger Contact Form”
3. On search result page it will show all blogger contact form messages you have received. Anyway, that's not where we are heading to.
4. Go back to the search text area, you will see a small arrow pointing down just before the search button. Click on it.
![]()
5. Look at the bottom right of the dropdown, click on create filter with this search
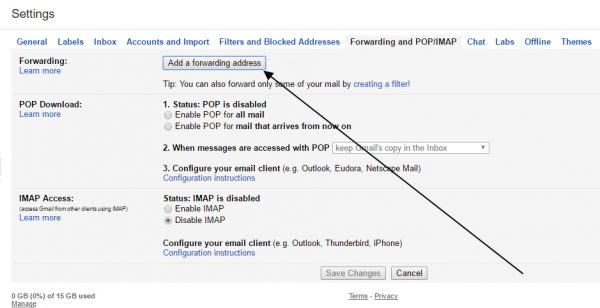
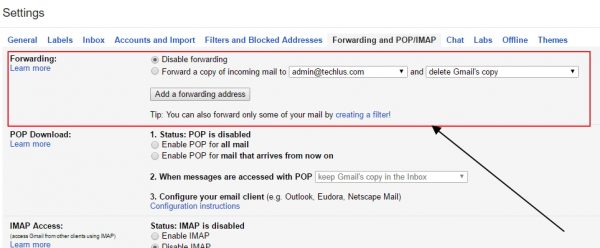
6. Another page will slide out, look for forward it. If you have the email address there before you will have the option to select the mail but if you haven't click on add forwarding address.

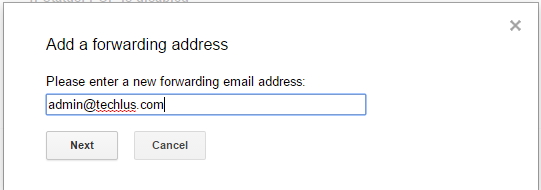
7. While on the forwarding address page, click on add a forwarding address. Input your business email address in the popup that show up. e.g. [email protected] as shown in the image. Click on Next, another popup will show just click on Proceed.
8. Now you have to confirm you own the business email you are adding, a mail will be sent to the address. Login to your business mail and locate the Google conformation email. You can follow activation link in the mail or you make use of the activation code. After activation you have options either to save a copy of the contact form mail messages in your Gmail or to delete them, choose anyone you prefer and save settings.
9. After successfully adding and confirming the business email, go back to the search text area at the top enter blogger contact form as the search keyword and click the drop-down arrow located before the search button.
10. Look at the bottom right of the dropdown, click on create filter with this search
11. Another page will slide out, look for forward it. Then choose the email address you will like to forward all contact form messages to.
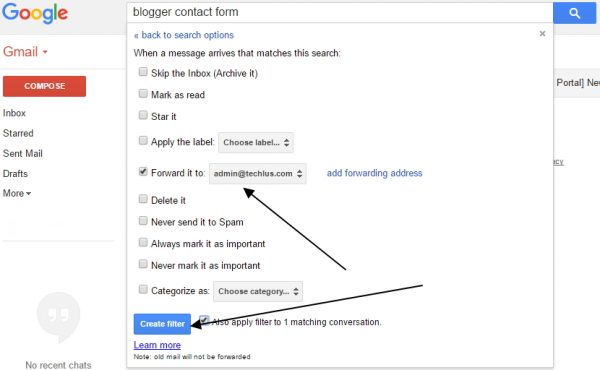
12. Click on create filter button located at the bottom right. And you will be provided with a success message as in the image below.

From now on once someone contacts you on your blog the message will be sent directly to your business email as well. I will be happy to hear back from you. Kindly drop me a comment below and don't forget to share this article.


Blogger is a great platform for your web content especially from SEO standpoint. But I rather go for WordPress…a Rocking Content Management platform with millions of websites and blogs sitting on it